Page Monitoring Video Tutorial
Hello and welcome to Accessible Web! Today we’re going to demonstrate how to get the most out of our page monitoring tool.
Overlays and AI based solutions are not sufficient on their own to make a website or web app accessible- on average, automated testing only catches around 30 percent of errors. However, automated testing can be a great way to rapidly discover some accessibility issues. Through the use of RAMP, you will be able to bring these issues to light, create remediation tasks from those discoveries, and set up a workflow using our notification system so that your developers know what needs to be addressed and can get the work done efficiently.
When you add your sitemap to the Accessible Web RAMP, our systems will start ingesting your website’s pages almost immediately and will check the sitemap for new pages periodically moving forward. If you’re just getting started, it may take up to 24 hours for your historical accessibility data to display in RAMP.
We then use our accessibility scanner on each page to check for WCAG violations. For more information on how the scanner checks for violations, visit our User Guide.
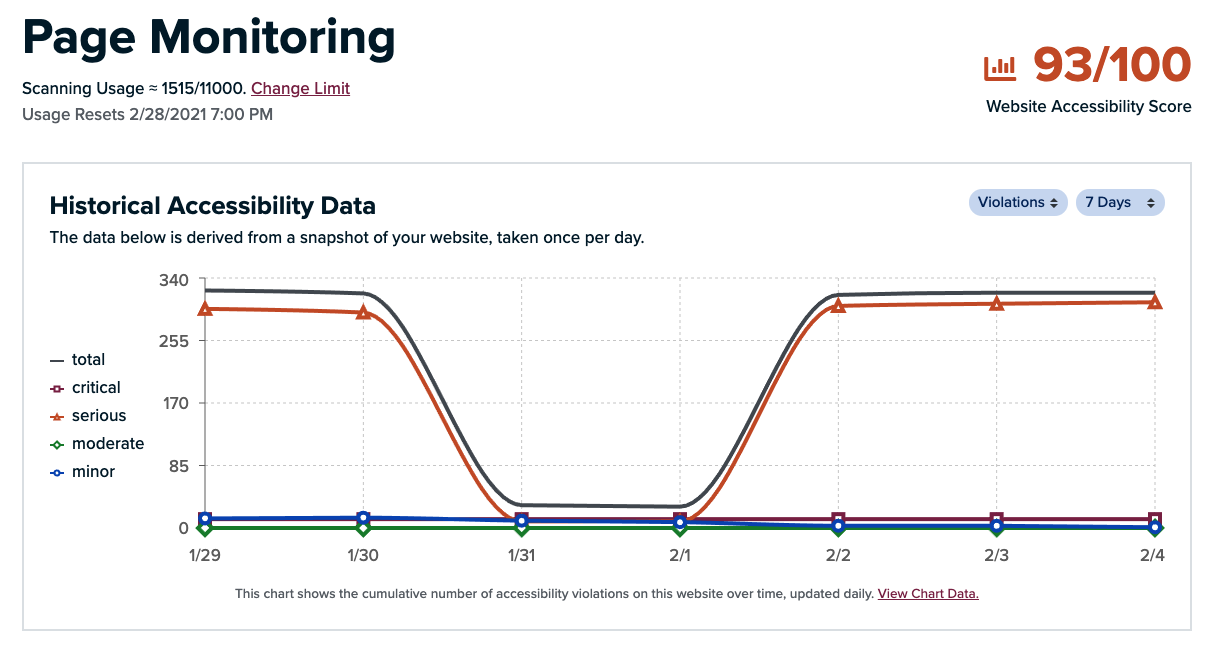
When viewing your results, you’ll have the option to view data over a seven day period, or over a thirty day period.
Looking at the scan results over the past thirty days for our sister company, Bytes.co, we can see that there’s a spike in violations each Monday. Let’s think about what could be causing this- are there any processes that occur each Monday?
We know that there is a chatbot on the site which goes offline each weekend, then comes back each Monday, so it makes perfect sense that we’d see this pattern of errors. We’ll confirm that this is the source of the error by looking at the failure details. These can be exposed by pressing the button associated with the failure, labelled “Details”. Now that we’ve found a pattern, we can address the issue globally instead of making a change to each individual page where this accessibility failure occurred.
To create a remediation task from a scan failure, simply press the button associated with the failure you’d like to create a task to address, labelled create remediation task. Additional information can be written within this remediation task so that other team members are aware. Once created, the remediation task will be displayed within the remediation tasks section of RAMP and users who have setup notifications will be notified that the new task has been created.
You’re also able to adjust the scan frequency of individual pages or groups of pages. If you’re looking for a way to cut down on costs related to scanning, it could be a good idea to change more static pages to be scanned less frequently; if the pages aren’t being changed, it’s unlikely that new errors will be present.
Lastly, we can check for invalid pages. When we deem a page to be “invalid” we will stop scanning it. If you believe we’ve incorrectly identified a page as invalid, you may manually rescan a page, and if all goes well we’ll start monitoring the page once again. For more information on why a page could be marked as invalid, visit our User Guide.
When using the page monitoring feature, don’t be shocked if you have a lot of errors. We’re constantly working on the accessibility of the Bytes.co site, and you have already seen that we frequently encounter errors! No website is perfect- accessibility is an ongoing effort.
The key is to address global issues first, followed by template specific issues, lastly addressing issues that are unique to certain pages. This way you can save time by fixing multiple issues across pages simultaneously, assuming your site is built in such a way that you can implement one change across multiple pages.
Thanks for watching! Check out our other videos for more tips on how to get the most out of RAMP, our tool for managing and organizing your accessibility work.