Your audit grid can be found in the manual auditing tab of your RAMP account. Automated accessibility testing tools improve efficiency and streamline the accessibility testing process. However, no software or artificial intelligence available today can do the entire job – that is where manual auditing comes in.
This article will cover the following:
- What is the audit grid?
- Setting up the grid
- Resetting and removing pages
- Conducting a test and creating tasks
What is the audit grid?
The audit grid simplifies the manual auditing process by allowing you to audit your site at your own pace while automatically quantifying your progress. The audit grid lets you:
- Plan your workload by previewing testing information — such as time estimates for each criterion,
- Follow detailed manual auditing instructions,
- Create remediation tasks on the spot,
- Watch your grid automatically fill up as you progress through each test.
The left column contains the success criteria (set as your conformance goal) against which you must test conformance. The top row should contain the pages that you want to audit. See adding pages.
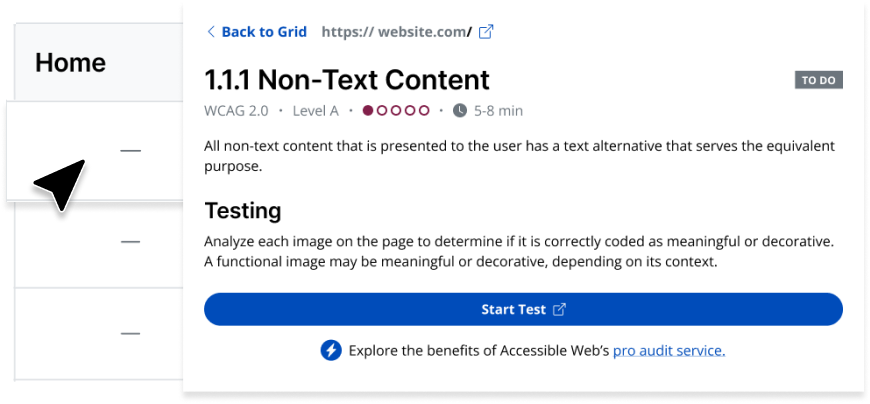
Each cell in the grid will display its corresponding page’s testing status for each success criterion. Clicking on any given cell opens up more information. Such as:
- Success criteria details
- Testing details
- Launch test button
- Related remediation tasks
Interpreting the grid
Cell statuses will automatically update as you perform the associated tests. You can re-test a page at any time to update its status. The following is a breakdown of the different statuses for each cell.
- To Do (dash): No tests have been conducted
- Incomplete Testing (half-filled triangle): Some, but not all, tests were performed
- Not Applicable (circle slash): Criterion does not apply to testing content
- Open Tasks (task icon with number): Every test was performed, and there are open remediation tasks
- Completed (checkmark): Every test was performed, and there are no open remediation tasks
Click the Legend button to view the legend from the grid.
Setting up your grid
Templates
Generally, it’s not necessary to audit every page on your platform, you can select pages that represent the templates on which your platform is built. For example, in the case of an e-commerce site, you might audit:
- Home
- Search Results
- Catalog
- Individual Product Listing
- Cart
- Checkout
- Sign Up
- Contact Us
Especially for pages that are built from a shared template, successes or issues you find on a representative page are likely also present on other pages from the same template.
For example, if you manually audit a product listing and find that you can’t add it to the cart using a keyboard alone, that issue is likely present on the other product pages as well.
Adding pages
The rightmost column will always contain the option to add a page.
Click the Add Page column header > Find or create the page > Choose a display name
Any new page’s status will be set to “To Do” by default. There is no limit to the number of pages that can be added to your grid. If a page is deleted from RAMP, the corresponding column in the grid will be deleted as well.
You can also add unique tags to organize the results for a page by more than just page URL.
When should I use page tags?
In certain scenarios, you may find it helpful to audit pages one section at a time instead of all at once. Common examples include:
- You’re auditing a lengthy page with many interactive sections
- You’re auditing a single page application with dynamic content changes
- You’re auditing content where different sections come from different sources – for example, the header is from a global template, the main content is from an individual blog post, and the contact form is from a 3rd party plug-in
Using tags, you can divide a single page into multiple columns in the grid. In the case of a homepage, you might use tags to create the following columns:
- Header & Footer
- Homepage Main Content
- Contact Form Pop-up
All will have the same URL, but they are further divided using the tags. As you conduct tests and track progress, you can focus on each section individually.
Resetting and removing pages
Resetting a page
If a page changes enough to constitute a new audit, you can clear the existing audit results and statuses by resetting the page. This will reset the statuses to “To Do” but will retain the data for historical purposes.
To reset a page, click on the ellipses icon in the column header of the page you wish to remove. This icon opens up the actions dropdown menu.
Ellipses > Reset > Confirm
Removing a page
Removing a page from your grid will not remove it from RAMP.
To remove a page, click on the ellipses icon in the column header of the page you wish to remove. This icon opens up the actions dropdown menu.
Ellipses > Remove page from grid > Confirm
Conducting a test
You can view testing details and launch a test from any cell.
Click any cell > After the slideout opens, click Start Test
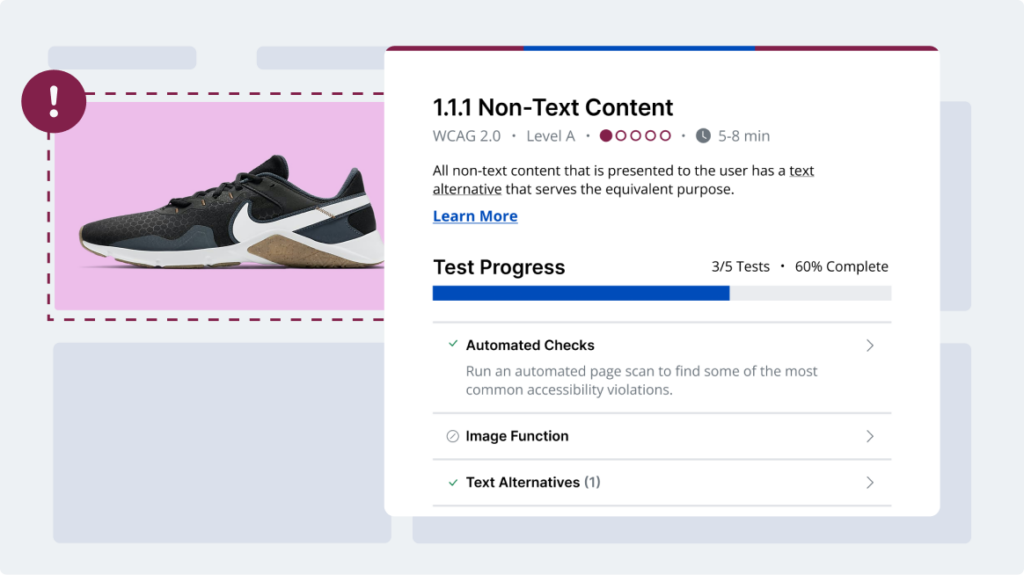
Launching a test will do the following simultaneously:
- Open our Chrome extension’s Guided Audit Tool to the corresponding success criteria testing window.
- Open up the page you selected to test.
Each success criterion requires different tests to audit for conformance. The testing window will quantify your progress as you complete each test. Some tests include a helper/assistant to help do the work (element highlighter, scanner, tab stop, etc.).
Creating remediation tasks
If you find a violation, create a remediation task straight from the extension. Doing so will change the cell’s status to “Open Tasks,” — indicating that there is work to do for the page to conform to that success criteria. Remediation tasks can be created from a common failure template or scratch and will automatically sync to RAMP.
Activity Log
View an activity log for any specific cell by clicking on it and scrolling to the bottom of the slideout. Log entries will be automatically created when:
- The page is added to the grid
- A test is launched
- A remediation task is created